Cooking
If you're looking for a last-minute homemade holiday gift for someone who likes to cook, how about some potholders? I grew up with potholders like this - they'd been crocheted for years by various women in my mother's family. I think some of the potholders we used (and possibly some of the ones I still use) may have even been made by my great-grandmother. The older potholders are typically yellow and white or red and white, but once my sister and I started making them we naturally gravitated to all kinds of colors and even those garish variegated threads.
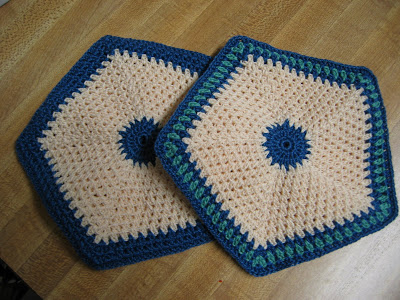
I made the pair above for Bob two Christmases ago and they pretty much follow the pattern of their predecessors - a dark center with a good-sized white middle enclosed by a dark border. I was running out of blue so I introduced a third color in the one on the right, but that's probably as heretical as using variegated thread :) The older ones in my possession have the remnants of little picots at each corner of the border, but I never figured out how to do those and frankly was never inclined - it's a potholder after all!
I think I learned to crochet by making these potholders. It was either my mother or Auntie Bee that showed me how, though it's not a pattern that's written down (until now) or memorized. I don't know about the earlier potholder-makers in my family, but I can't make one without having a completed one to look at. I've never felt that I made the middles quite right, since I always end up with a little larger (often lopsided) hole in the middle, but I think these instructions will set you in the right direction and then you can refine them to your liking. Switch colors as you like - it's your potholder!
I'll apologize in advance about this pattern - I'm not well acquainted with crochet patterns, so this may not be very clear. Please feel free to email me if you have any questions!
The potholder is made of two identical pieces (though the color patterns need not be the same) that are joined by one more round that is worked through both pieces. I use a size 7 steel crochet hook with regular (size 10) cotton crochet thread.
Chain 7 (or less - I was just thinking that maybe there's a sneaky way to do this on just a loop of thread so you could pull it tight and close up that little hole in the middle) and join to form a loop.
I usually join each round by pulling a loop through and then chaining two.
Round 1 - work 10 single crochet (sc) in the loop and join.
Round 2 - work 2 double crochet (dc) in each sc (20 dc total) and join.
Round 3 - work 2 dc in each dc (actually it's really in the spaces between the dc) (40 dc total) and join.
Round 4 - in this round you establish the "corners" of the potholder where all the remaining increases will occur. Work 4 dc in the space between the first two pairs of dc and then 2 dc in each of the next 3 spaces. Repeat this four more times and join.
Rounds 5 - 11 (you can do more or less depending on the size potholder you want) - continue in the same way as round 4, always working 4 dc at each corner and 2 dc in the spaces.
** Update 8/16/08 - I just made a couple potholders by following the pattern as I wrote it here and realized that 11 rounds is a little small. I'd recommend 12 to 13 rounds for each piece and then join with another round as described below. **
When done, join, cut the thread and pull it through. Weave cut thread ends into the wrong side of the potholder to secure them and hide them. Work the other piece of the potholder in the same way, but don't cut the thread.
To join the two pieces, put the wrong sides together and work one more round in the established pattern. For this round you'll need to work through both sides, being careful that they are lined up correctly. When done, join, pull the thread through and weave in the end.
I think these potholders improve with age - they tend to tighten up and flatten out. They're not as big or thick as some potholders, but I think they're just right!
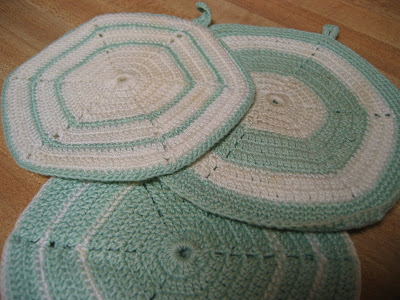
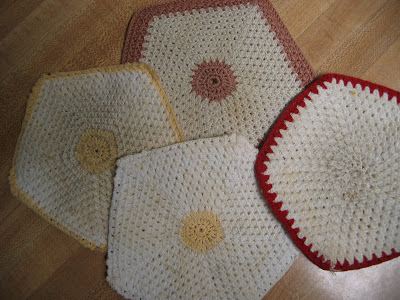
A few years ago I was browsing in a little antique shop in Greenwich Village and found some very similar potholders for just $2.00 each! Of course I bought all three. The increases are done differently and they have six sides rather than five. I haven't attempted to figure out the pattern yet, but hope to someday. I'll close with pictures of them (they're light green and white) and of some of my older potholders (the rust and white one is one I made a few years back, but the others are much older). If I'd planned better, I would have washed them before taking the picture - sorry!
- Sewing - Project Christina
Back in April, knowing my nine-year-old niece's passion for Project Runway and her desire to be a fashion designer when she grows up, and being at a loss as to what to give her for her birthday, I wrote a little "press release" and tucked it in a...
- Weaving: Now Where Were We?
I sort of left you hanging didn't I? Sorry about that... actually, not only haven't I been blogging, I've been spending precious little time weaving. I really have got to get my priorities in order! I have spent a few hours weaving and have...
- Weaving: Ready, Set, Go!
Funny thing about "weaving", a major chunk of the time and effort that goes into a weaving project is not spent actually weaving. Normally, there's a considerable amount of effort that goes into planning your project; then you must prepare the warp...
- Invitation To Brunch...
Cath and I are co-hosting a new edition of Cookbook Spotlight on April 17 with Gale Gand’s new book. You may remember from the last few Cookbook Spotlights that food bloggers select recipes from the same cookbook, make the dish, and blog about it....
- Blogging By Mail: Little Things Mean A Lot
It's back!!! The much-beloved, International blog swap is back for another round. Bloggers from all over the globe are sending goodies to fellow foodies from near and far, and it's a lot of fun. An event created by Nic of Baking Bites, I've...
Cooking
Crochet: Old Fashioned Potholders
If you're looking for a last-minute homemade holiday gift for someone who likes to cook, how about some potholders? I grew up with potholders like this - they'd been crocheted for years by various women in my mother's family. I think some of the potholders we used (and possibly some of the ones I still use) may have even been made by my great-grandmother. The older potholders are typically yellow and white or red and white, but once my sister and I started making them we naturally gravitated to all kinds of colors and even those garish variegated threads.
I made the pair above for Bob two Christmases ago and they pretty much follow the pattern of their predecessors - a dark center with a good-sized white middle enclosed by a dark border. I was running out of blue so I introduced a third color in the one on the right, but that's probably as heretical as using variegated thread :) The older ones in my possession have the remnants of little picots at each corner of the border, but I never figured out how to do those and frankly was never inclined - it's a potholder after all!
I think I learned to crochet by making these potholders. It was either my mother or Auntie Bee that showed me how, though it's not a pattern that's written down (until now) or memorized. I don't know about the earlier potholder-makers in my family, but I can't make one without having a completed one to look at. I've never felt that I made the middles quite right, since I always end up with a little larger (often lopsided) hole in the middle, but I think these instructions will set you in the right direction and then you can refine them to your liking. Switch colors as you like - it's your potholder!
I'll apologize in advance about this pattern - I'm not well acquainted with crochet patterns, so this may not be very clear. Please feel free to email me if you have any questions!
The potholder is made of two identical pieces (though the color patterns need not be the same) that are joined by one more round that is worked through both pieces. I use a size 7 steel crochet hook with regular (size 10) cotton crochet thread.
Chain 7 (or less - I was just thinking that maybe there's a sneaky way to do this on just a loop of thread so you could pull it tight and close up that little hole in the middle) and join to form a loop.
I usually join each round by pulling a loop through and then chaining two.
Round 1 - work 10 single crochet (sc) in the loop and join.
Round 2 - work 2 double crochet (dc) in each sc (20 dc total) and join.
Round 3 - work 2 dc in each dc (actually it's really in the spaces between the dc) (40 dc total) and join.
Round 4 - in this round you establish the "corners" of the potholder where all the remaining increases will occur. Work 4 dc in the space between the first two pairs of dc and then 2 dc in each of the next 3 spaces. Repeat this four more times and join.
Rounds 5 - 11 (you can do more or less depending on the size potholder you want) - continue in the same way as round 4, always working 4 dc at each corner and 2 dc in the spaces.
** Update 8/16/08 - I just made a couple potholders by following the pattern as I wrote it here and realized that 11 rounds is a little small. I'd recommend 12 to 13 rounds for each piece and then join with another round as described below. **
When done, join, cut the thread and pull it through. Weave cut thread ends into the wrong side of the potholder to secure them and hide them. Work the other piece of the potholder in the same way, but don't cut the thread.
To join the two pieces, put the wrong sides together and work one more round in the established pattern. For this round you'll need to work through both sides, being careful that they are lined up correctly. When done, join, pull the thread through and weave in the end.
I think these potholders improve with age - they tend to tighten up and flatten out. They're not as big or thick as some potholders, but I think they're just right!
A few years ago I was browsing in a little antique shop in Greenwich Village and found some very similar potholders for just $2.00 each! Of course I bought all three. The increases are done differently and they have six sides rather than five. I haven't attempted to figure out the pattern yet, but hope to someday. I'll close with pictures of them (they're light green and white) and of some of my older potholders (the rust and white one is one I made a few years back, but the others are much older). If I'd planned better, I would have washed them before taking the picture - sorry!
- Sewing - Project Christina
Back in April, knowing my nine-year-old niece's passion for Project Runway and her desire to be a fashion designer when she grows up, and being at a loss as to what to give her for her birthday, I wrote a little "press release" and tucked it in a...
- Weaving: Now Where Were We?
I sort of left you hanging didn't I? Sorry about that... actually, not only haven't I been blogging, I've been spending precious little time weaving. I really have got to get my priorities in order! I have spent a few hours weaving and have...
- Weaving: Ready, Set, Go!
Funny thing about "weaving", a major chunk of the time and effort that goes into a weaving project is not spent actually weaving. Normally, there's a considerable amount of effort that goes into planning your project; then you must prepare the warp...
- Invitation To Brunch...
Cath and I are co-hosting a new edition of Cookbook Spotlight on April 17 with Gale Gand’s new book. You may remember from the last few Cookbook Spotlights that food bloggers select recipes from the same cookbook, make the dish, and blog about it....
- Blogging By Mail: Little Things Mean A Lot
It's back!!! The much-beloved, International blog swap is back for another round. Bloggers from all over the globe are sending goodies to fellow foodies from near and far, and it's a lot of fun. An event created by Nic of Baking Bites, I've...