Cooking
Funny thing about "weaving", a major chunk of the time and effort that goes into a weaving project is not spent actually weaving. Normally, there's a considerable amount of effort that goes into planning your project; then you must prepare the warp to go on the loom, and then you must "dress" the loom. In order to simplify things this time around, I short-circuited the planning step by choosing a project from A Handwoven Treasury (which also happens to be something I've made before).
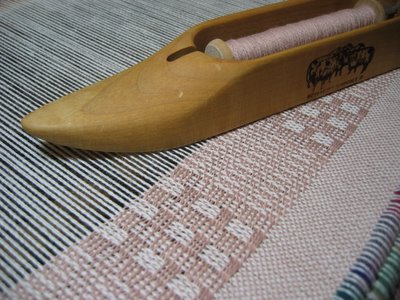
I'm making dish towels ("Keep it Simple Towel" on pages 60-61). These towels are made of unmercerized 8/2 cotton, which is absorbent, inexpensive, available in an endless variety of colors, and easy to work with. In my opinion, it also produces beautiful cloth. Quite some time ago I purchased a 25-pound grab bag of the stuff. Not surprisingly, I got some pretty strange colors, but there were some good ones too. And actually, I suspect even the colors that look awful on the cone, like the one above - a hideous pinkish beige, will work up into an attractive end product.
For these towels I am using white for the warp (the lengthwise threads in the cloth) and plan to try out several different colors for the weft (the crosswise thread in the cloth). The process of preparing the warp is more involved than you might think. I remember the first project in my weaving class... the teacher revealed each step only as the prior step was completed, all the while reminding us to keep even tension, etc. By the time our warps were ready to go on the loom, they were like our babies. When we were instructed to cut the end off after beaming the warp (i.e. rolling it onto the back beam of the loom), my fellow students reacted with shock, "you want us to do what!?!"
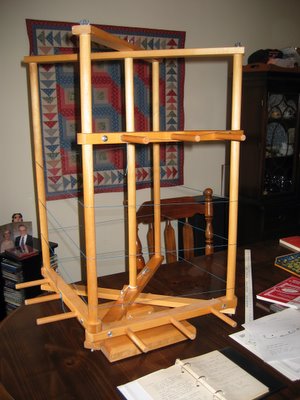
Warping reel with guide string
To wind a warp you need either a warping board or a warping reel. I have a reel and am very happy with it. We used a board in class - it takes a little longer, can be hard on your shoulder and wrist, and can't accomodate a long warp like a warping reel can. I'm going to gloss over this step with just a couple of photos, but there's actually a whole (very good) book on the subject.
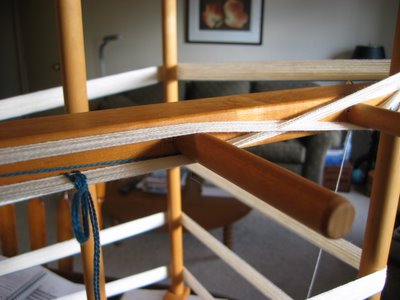
Warping reel with the cross on the right and counting thread on the left
When you wind a warp on a warping board or reel, you're not only measuring it out, you're creating "the cross" - a really simple and clever way of keeping all the threads in order through the process of dressing the loom.
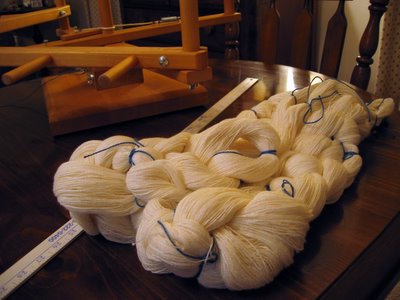
The finished warp - chained and ready for the loom
I learned to warp the loom from back to front, which means you wind the warp onto the back beam, then thread the heddles, then sley the reed, then tie the warp to the front beam. Warping from front to back is an entirely different process. From what I understand, each method is suited to particular situations, so it is probably a good idea to become familiar with both approaches. I have not yet attempted warping from front to back, but it's on my list!
When warping from back to front, you use something called a raddle to space the warp threads correctly across the back beam. So after putting the lease sticks in the cross, the first step is to distribute the threads into the raddle sections. The number of threads you put in each section depends on the size of the section (each is half an inch on my raddle) and the sett of the cloth you will be weaving (20 ends per inch, or 20 epi for this project).
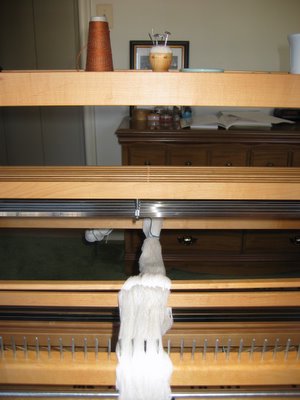
The lease sticks are just behind the raddle
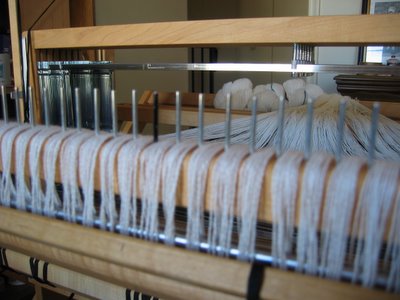
The warp threads distributed in the raddle sections
After the raddle is loaded, the warp is wound onto the back beam. Now, in my mind, is when the fun begins! I'm not entirely comfortable with the process of winding the warp and beaming the warp, so I get a little stressed during that part. But I really enjoy threading the heddles and sleying the reed...
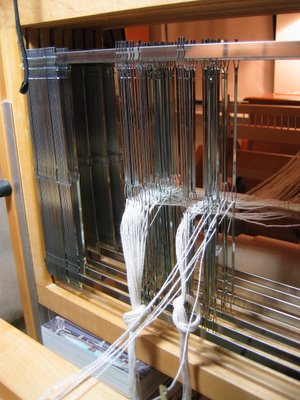
Threading the heddles
This pattern uses four shafts (a shaft is the frame that holds the heddles and which can be raised to create a space or shed, through which the shuttle can be thrown). Each warp thread is threaded through one heddle in one of the shafts. How they're, threaded together with the treadling, determines how the fabric will look.
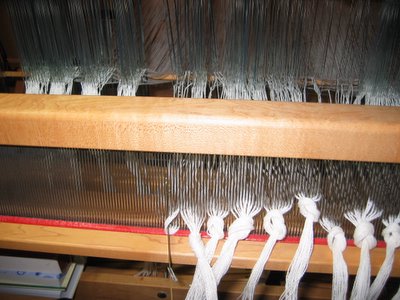
Sleying the reed
The reed keeps the warp threads spaced correctly while you are weaving. It sits in the beater and is what is used to push the weft into place after the shuttle is thrown.
Just a couple more small steps and we're ready to weave!
-
Have you ever tasted ten varieties of salt? Trying them out I only found a couple that tasted different from one another, which confirms my belief that the texture of the salt--flakes, grains, chunks, has more to do with how we taste it than it's...
- Crochet: Old Fashioned Potholders
If you're looking for a last-minute homemade holiday gift for someone who likes to cook, how about some potholders? I grew up with potholders like this - they'd been crocheted for years by various women in my mother's family. I think some...
- Oh No, Five-o!
My name is Cathy and I'm a 50-year-old blogger. Waahhhhh!!!!! Birthdays come and go and I don't give them much thought, but this one is different. It's not the vanity thing... it's the living thing! I keep thinking, best case - I've...
- What I've Been Up To...
Not much cooking happening 'round here lately... What I have been doing is starting my first weaving project in over six years. Weaving is a hobby I took up about ten years ago after visiting New Mexico. It seemed that weaving shops and weaving demos...
- The Post About Posts
I have a serious back-log of posts...I'll get them up as soon as I can! First: I'd found a recipe for smoked salmon, and since that smoker I bought Matt a few years ago has gotten very little use, I gently 'suggested' he try it out. One...
Cooking
Weaving: Ready, Set, Go!
Funny thing about "weaving", a major chunk of the time and effort that goes into a weaving project is not spent actually weaving. Normally, there's a considerable amount of effort that goes into planning your project; then you must prepare the warp to go on the loom, and then you must "dress" the loom. In order to simplify things this time around, I short-circuited the planning step by choosing a project from A Handwoven Treasury (which also happens to be something I've made before).
I'm making dish towels ("Keep it Simple Towel" on pages 60-61). These towels are made of unmercerized 8/2 cotton, which is absorbent, inexpensive, available in an endless variety of colors, and easy to work with. In my opinion, it also produces beautiful cloth. Quite some time ago I purchased a 25-pound grab bag of the stuff. Not surprisingly, I got some pretty strange colors, but there were some good ones too. And actually, I suspect even the colors that look awful on the cone, like the one above - a hideous pinkish beige, will work up into an attractive end product.
For these towels I am using white for the warp (the lengthwise threads in the cloth) and plan to try out several different colors for the weft (the crosswise thread in the cloth). The process of preparing the warp is more involved than you might think. I remember the first project in my weaving class... the teacher revealed each step only as the prior step was completed, all the while reminding us to keep even tension, etc. By the time our warps were ready to go on the loom, they were like our babies. When we were instructed to cut the end off after beaming the warp (i.e. rolling it onto the back beam of the loom), my fellow students reacted with shock, "you want us to do what!?!"
Warping reel with guide string
To wind a warp you need either a warping board or a warping reel. I have a reel and am very happy with it. We used a board in class - it takes a little longer, can be hard on your shoulder and wrist, and can't accomodate a long warp like a warping reel can. I'm going to gloss over this step with just a couple of photos, but there's actually a whole (very good) book on the subject.
Warping reel with the cross on the right and counting thread on the left
When you wind a warp on a warping board or reel, you're not only measuring it out, you're creating "the cross" - a really simple and clever way of keeping all the threads in order through the process of dressing the loom.
The finished warp - chained and ready for the loom
I learned to warp the loom from back to front, which means you wind the warp onto the back beam, then thread the heddles, then sley the reed, then tie the warp to the front beam. Warping from front to back is an entirely different process. From what I understand, each method is suited to particular situations, so it is probably a good idea to become familiar with both approaches. I have not yet attempted warping from front to back, but it's on my list!
When warping from back to front, you use something called a raddle to space the warp threads correctly across the back beam. So after putting the lease sticks in the cross, the first step is to distribute the threads into the raddle sections. The number of threads you put in each section depends on the size of the section (each is half an inch on my raddle) and the sett of the cloth you will be weaving (20 ends per inch, or 20 epi for this project).
The lease sticks are just behind the raddle
The warp threads distributed in the raddle sections
After the raddle is loaded, the warp is wound onto the back beam. Now, in my mind, is when the fun begins! I'm not entirely comfortable with the process of winding the warp and beaming the warp, so I get a little stressed during that part. But I really enjoy threading the heddles and sleying the reed...
Threading the heddles
This pattern uses four shafts (a shaft is the frame that holds the heddles and which can be raised to create a space or shed, through which the shuttle can be thrown). Each warp thread is threaded through one heddle in one of the shafts. How they're, threaded together with the treadling, determines how the fabric will look.
Sleying the reed
The reed keeps the warp threads spaced correctly while you are weaving. It sits in the beater and is what is used to push the weft into place after the shuttle is thrown.
Just a couple more small steps and we're ready to weave!
-
Have you ever tasted ten varieties of salt? Trying them out I only found a couple that tasted different from one another, which confirms my belief that the texture of the salt--flakes, grains, chunks, has more to do with how we taste it than it's...
- Crochet: Old Fashioned Potholders
If you're looking for a last-minute homemade holiday gift for someone who likes to cook, how about some potholders? I grew up with potholders like this - they'd been crocheted for years by various women in my mother's family. I think some...
- Oh No, Five-o!
My name is Cathy and I'm a 50-year-old blogger. Waahhhhh!!!!! Birthdays come and go and I don't give them much thought, but this one is different. It's not the vanity thing... it's the living thing! I keep thinking, best case - I've...
- What I've Been Up To...
Not much cooking happening 'round here lately... What I have been doing is starting my first weaving project in over six years. Weaving is a hobby I took up about ten years ago after visiting New Mexico. It seemed that weaving shops and weaving demos...
- The Post About Posts
I have a serious back-log of posts...I'll get them up as soon as I can! First: I'd found a recipe for smoked salmon, and since that smoker I bought Matt a few years ago has gotten very little use, I gently 'suggested' he try it out. One...